
⚡ Quick Answer
Building an atmospheric water generator means assembling four interdependent sub-systems: a refrigeration circuit, a condensation chamber, a food-grade collection reservoir, and a three-stage filtration stack. Realistic parts costs run $200–$450; the full build spans 15–25 hours across two or three weekends. The variables that determine whether your build succeeds — or stalls in expensive re-work — are climate suitability (50%+ relative humidity), refrigerant circuit quality, and filtration selection. A tested DIY blueprint addresses all three up front.
Key Takeaways
- Four sub-systems: refrigeration circuit, condensation chamber, collection reservoir, filtration stack
- Realistic parts budget: $200–$450 (salvaged HVAC components reduce the refrigeration portion by 40–60%)
- Time investment: 15–25 hours including sourcing, assembly, pressure-testing, and calibration
- Minimum climate requirement: 50%+ relative humidity for consistent daily output
- Most common build failure: inadequate silver-brazing on refrigerant joints or undersized UV steriliser
Most online guides make building an AWG sound like an afternoon project. The realistic picture is closer to two or three focused weekends — not because the build is technically complex, but because sourcing compatible components, pressure-testing a sealed refrigerant circuit, and calibrating output across a range of ambient conditions all take time to do correctly.
This guide gives you the planning-phase view: what each sub-system is and why it matters, what components actually cost when sourced correctly (not the optimistic “salvage everything for $50” version), and what a realistic build timeline looks like. If you are ready to move into hands-on execution, the step-by-step DIY AWG build guide covers the assembly sequence in detail.
The Four Sub-Systems of Any AWG Build
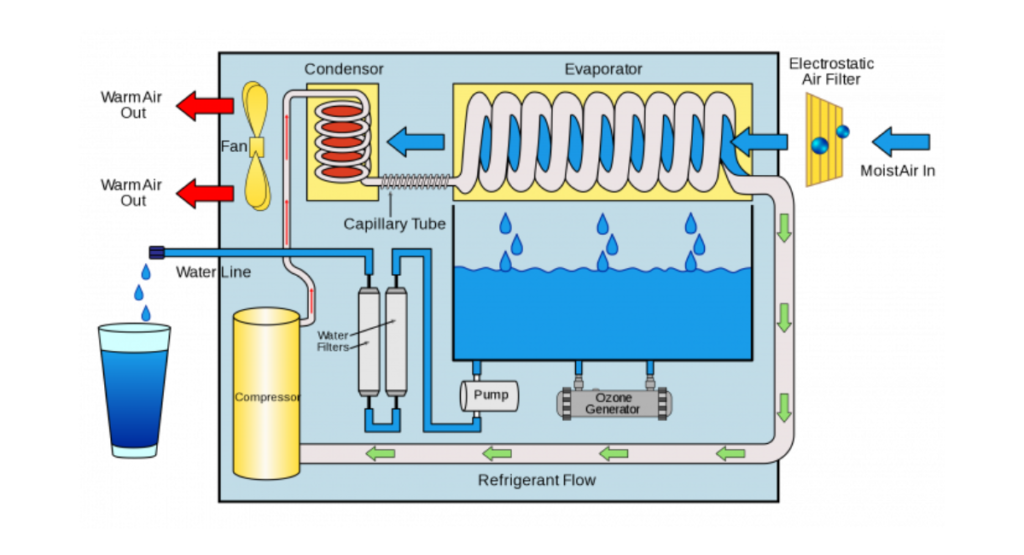
Understanding what an AWG is before shopping for parts prevents the most expensive sourcing mistakes. Every atmospheric water generator — from a $200 DIY build to a $30,000 commercial unit — performs the same four functions. For a detailed explanation of the underlying physics, see the guide on how atmospheric water generators work.
1. Refrigeration Circuit
The refrigeration circuit is the engine. A hermetic compressor drives refrigerant in a closed loop: compressed gas releases heat in the condenser coil, then passes through a capillary tube or expansion valve to drop in temperature and pressure. This cold refrigerant flows into the evaporator coil, chilling its surface to 45–52°F (7–11°C) — below the dew point of ambient air. Warm, humid air blown across the coil deposits condensate.
This sub-system is also the most technically demanding to assemble. It involves pressure vessels, brazed copper joints, and regulated refrigerants. The EPA’s Section 608 regulations govern refrigerant handling in the U.S.; purchasing bulk R-134a for DIY use requires Section 608 certification or a licensed HVAC technician.
2. Condensation Chamber
The condensation chamber is an insulated enclosure housing the evaporator coil. Its job is to maximise contact time between humid air and the cold coil surface while preventing heat from re-entering the system. A poorly insulated chamber reduces condensation yield by 25–40% vis-à-vis an optimised design operating in identical ambient conditions — a performance penalty that no amount of downstream tweaking can recover.
3. Collection Reservoir
Condensate drips from the coil into a food-grade collection tank. This sub-system sounds straightforward but is a common oversight: non-food-grade plastics leach plasticisers into water over time, and an unsealed tank allows recontamination from ambient air. NSF International’s Standard 61 governs food-contact safety for drinking-water system components — NSF-61 certified HDPE or stainless steel are the two appropriate materials.
4. Filtration Stack
Condensed water contains whatever was in the air: bacteria, volatile organic compounds (VOCs), particulates, and — in urban or industrial environments — trace heavy metals or pesticide residues. The minimum safe filtration stack is three stages: a 5-micron sediment pre-filter, an activated-carbon block, and a UV steriliser delivering at least 40 mJ/cm² of UV dose. The CDC Household Water Treatment guidelines confirm this combination addresses bacteria, viruses, Cryptosporidium, and common organic contaminants without introducing chemical residues.
For the builders reading this: Curious about what it actually takes to build an Atmospheric Water Generator?
There’s a documented DIY blueprint for a household-scale atmospheric water generator: parts list, wiring, the cooling-stage design, and the filter stack that makes the water actually drinkable. Most readers finish the build in one or two weekends. Worth a look before deciding if it’s a fit for you.
Component-by-Component Cost Breakdown
The table below splits costs into new-purchase and salvaged scenarios. Prices reflect mid-2026 U.S. market rates. Salvaging HVAC equipment is the single biggest lever for reducing total build cost, but it introduces compatibility risk — match the compressor displacement to the coil geometry before committing to a salvaged unit.
| Component | New (USD) | Salvaged (USD) | Notes |
|---|---|---|---|
| Hermetic compressor (1/8–1/4 HP) | $60–$90 | $10–$25 | Window AC, mini-fridge, or dehumidifier compressors are all usable |
| Evaporator coil (copper, 3/8″ OD) | $20–$40 | $5–$15 | Pre-formed coils save 2–3 hours of field-bending |
| Condenser coil / brazed-plate HX | $20–$35 | $5–$12 | Brazed-plate heat exchangers from plumbing suppliers work well |
| Capillary tube or TXV | $5–$15 | $2–$8 | Match tube length to compressor displacement |
| Refrigerant R-134a (12 oz) | $15–$25 | n/a | EPA Section 608 certification required in the U.S. |
| NSF-61 food-grade collection tank | $15–$30 | $5–$15 | HDPE or stainless steel only |
| Sediment filter housing + cartridge | $10–$18 | n/a | Replace every 3–6 months |
| Activated-carbon block housing + cartridge | $18–$28 | n/a | Replace every 3–6 months |
| UV steriliser (4–6W, 12V) | $28–$55 | n/a | Replace lamp annually; verify 40 mJ/cm² dose at rated flow rate |
| 12V cooling fan (120mm) | $10–$18 | $3–$8 | Minimum 60 CFM for 1/8 HP compressor |
| Closed-cell insulation foam (1 sheet) | $12–$20 | n/a | R-6 minimum for chamber walls |
| Wiring, fuses, terminals, switch | $18–$28 | n/a | 12V DC bus for solar compatibility |
| Enclosure / housing | $20–$40 | $5–$15 | Plastic tote for prototyping; sheet metal for permanent installs |
| Total (all new) | $251–$442 | ||
| Total (mostly salvaged) | $153–$276 | Refrigeration portion only; filtration must be new |
Hidden Costs Most First-Time Builders Overlook
The component table is the visible cost. Three categories of costs consistently surprise first-time builders:
1. Refrigerant Certification or Technician Fee
If you are not EPA Section 608 certified, a local HVAC technician will charge $40–$80 to charge your circuit. Budget for this from the start rather than discovering the regulation after your circuit is already assembled and sitting uncharged. The alternative — pursuing Section 608 Type II certification yourself — takes roughly 4 hours of study and costs $20–$40 for the proctored exam.
2. Re-Work from Pressure Leaks
The most common first-build mistake is inadequate silver-brazing at joint connections. A single micro-leak means removing the refrigerant charge (which requires recovery equipment to stay legal), repairing the joint, recharging, and retesting. Technician service time adds $50–$100 per visit. A naïve skip of the nitrogen pressure test — treating it as optional — is the single fastest way to turn a $250 build into a $400 one.
3. Ongoing Filter Replacement Costs
A three-stage filtration system requires cartridge replacements every 3–6 months and a UV lamp replacement annually. Annual filter replacement costs run $50–$100 depending on cartridge brand and UV lamp wattage. This is an ongoing operational cost — not a one-time build expense. Factor it in when comparing a DIY AWG against bottled water or municipal water costs over a 5-year horizon. The atmospheric water generator cost analysis on this site runs the full 5-year math.
Realistic Build Timeline
A 15–25-hour time investment breaks down across five phases:
| Phase | Activities | Time Estimate |
|---|---|---|
| Phase 1 — Sourcing and preparation | Research and order components, receive and inspect parts, acquire tools | 3–5 hours |
| Phase 2 — Refrigeration assembly | Compressor mounting, coil bending, silver-brazing all joints, nitrogen pressure test, refrigerant charging | 4–7 hours |
| Phase 3 — Chamber, reservoir, filtration | Condensation chamber construction, collection tank setup, three-stage filtration plumbing | 4–6 hours |
| Phase 4 — Electrical wiring | 12V DC bus, fuses, switch, compressor/fan/UV connections | 2–3 hours |
| Phase 5 — Testing and calibration | First run, coil temperature check (target 45–52°F / 7–11°C), condensate flow verification, 24-hour output measurement, filter flush | 3–5 hours |
Most builders spread phases 2 and 3 across separate weekends rather than attempting them back-to-back. Phase 2 in particular benefits from a fresh pair of eyes the following day when inspecting brazed joints before adding refrigerant.
For the builders reading this: Curious about what it actually takes to build an Atmospheric Water Generator?
There’s a documented DIY blueprint for a household-scale atmospheric water generator: parts list, wiring, the cooling-stage design, and the filter stack that makes the water actually drinkable. Most readers finish the build in one or two weekends. Worth a look before deciding if it’s a fit for you.
The Three Build Mistakes That Cost the Most Time and Money
1. Skipping the Nitrogen Pressure Test
Charging a leaking circuit with refrigerant and then discovering the leak requires venting that refrigerant — which is illegal without EPA-approved recovery equipment — and calling a technician to perform the recovery and recharge. A 30-minute nitrogen pressure test before charging consistently saves 3–4 hours of downstream re-work. There is no shortcut worth taking here.
2. Using Soft Solder on Refrigerant Lines
Soft solder (50/50 or 60/40 tin-lead) fails at refrigerant operating pressures over time. All joints in the refrigerant circuit must be silver-brazed using 15% silver solder or higher. This is non-negotiable. It is also the detail most general-purpose Internet guides on DIY refrigeration gloss over — often because their authors have not actually attempted a long-term build and do not know about the failure mode.
3. Undersizing the UV Chamber
A UV steriliser that delivers less than 40 mJ/cm² at its rated flow rate will not adequately inactivate Cryptosporidium and Giardia, per the EPA UV Disinfection Guidance Manual. Some budget UV units meet the 40 mJ/cm² specification only at very low flow rates — well below the 0.5 L/min needed for a practical tap. Always check the manufacturer’s flow-rate versus UV-dose performance curve, not just the watt rating, before purchasing.
Climate Suitability: The Prerequisite That Determines Everything
No amount of build quality compensates for an arid climate. The NOAA Climate Data Online portal provides monthly average relative humidity data for any U.S. location. Check your local averages before committing to a build.
The practical threshold: ambient temperature above 65°F (18°C) and RH above 50% gives a workable dew-point margin. At 75°F (24°C) and 65% RH, a properly built 1/8 HP unit will deliver 3–5 litres per day. At 55°F (13°C) and 40% RH — common in interior western U.S. in winter — the same unit delivers near-zero output and runs continuously without collecting meaningful water.
The USGS Water Science School notes that the atmosphere contains roughly 3,100 cubic miles of water at any given time — but that resource is distributed unevenly. In humid coastal regions, a small AWG is a practical supplement. In arid inland regions, it is not the right tool.
DIY Build vs. Pre-Designed Blueprint: Which Is Right for You?
A from-scratch build is genuinely rewarding. The other approach — starting from a validated blueprint — is not the shortcut of someone who lacks commitment; it is the choice of someone who has correctly identified that component compatibility, refrigerant charge weight, and filtration stack sizing are the three variables most likely to cause failure, and that these have already been solved by someone who has run dozens of builds.
A blueprint does not replace the build; it replaces the trial-and-error. You still silver-braze the joints, mount the compressor, and wire the 12V bus. The blueprint tells you the exact capillary tube length that matches your compressor displacement, the exact refrigerant charge weight that matches your coil volume, and the exact UV chamber specification that meets the CDC’s 40 mJ/cm² threshold at 0.5 L/min. Those three pieces of information alone are worth significantly more than the cost of any blueprint on the market.
Build Right the First Time
The Smart Water Box blueprint specifies exact component dimensions, a tested refrigerant charge table, and a filtration stack validated for drinking-water quality. It eliminates the three most expensive first-build mistakes covered in this guide.
For the builders reading this: Curious about what it actually takes to build an Atmospheric Water Generator?
There’s a documented DIY blueprint for a household-scale atmospheric water generator: parts list, wiring, the cooling-stage design, and the filter stack that makes the water actually drinkable. Most readers finish the build in one or two weekends. Worth a look before deciding if it’s a fit for you.
Frequently Asked Questions
What is the minimum climate condition for a DIY AWG to work?
Ambient temperature above 65°F (18°C) and relative humidity above 50% is the practical minimum for consistent output. Below those thresholds the dew point margin narrows, condensation slows, and the compressor may run continuously without collecting a meaningful volume of water. At 72°F (22°C) and 60% RH — conditions that describe a large portion of the U.S. Southeast, Gulf Coast, and Pacific Northwest — a properly built unit will produce 2–4 litres per day.
Can I use R-410A instead of R-134a in a DIY build?
R-410A operates at significantly higher pressures (up to 600 psi at discharge) than R-134a (up to 200 psi). Standard DIY copper tubing and fittings sized for R-134a are not rated for R-410A pressures. Using R-410A in a circuit designed for R-134a is a safety risk and is not recommended. R-134a or R-600a (isobutane, used in modern mini-fridges) are the appropriate refrigerants for DIY AWG builds.
How long does a DIY AWG last before needing major repairs?
A hermetic compressor from a window AC unit or mini-fridge has a rated service life of 10,000–20,000 hours (roughly 4–8 years of continuous operation). The filtration components require routine replacement (cartridges every 3–6 months, UV lamp annually) but rarely fail catastrophically. The most common early-life failure is a refrigerant leak at a brazed joint that was not silver-brazed correctly. Properly assembled circuits routinely run 5–10 years without major refrigerant system work.
What tools do I need to build an AWG that I may not already own?
The specialised tools are: a silver-brazing torch (MAPP gas or oxy-acetylene), a refrigeration manifold gauge set for pressure testing, and a contact thermometer for calibrating coil surface temperature. A tube cutter and bending spring for copper tubing are inexpensive ($10–$20 combined). The manifold gauge set is the most significant tool cost if purchased new ($40–$80); they are frequently available second-hand from HVAC supply liquidators for $20–$30.
Is building a DIY AWG cheaper than buying a commercial residential unit?
Yes, significantly. Entry-level commercial residential AWGs start at $500–$800 and mid-range units run $1,500–$3,000. A first DIY build at $250–$450 in parts (plus a $30–$60 blueprint) delivers comparable output to entry-level commercial units in similar climate conditions. The trade-off is time: a commercial unit is plug-and-play, while a DIY build requires 15–25 hours of assembly. Over five years, the DIY route saves $300–$2,500 depending on which commercial unit you compare against.
Leave a Reply