
⚡ Quick Answer
A DIY atmospheric water generator uses a refrigeration-cycle condenser to chill incoming air below its dew point, condenses moisture onto an evaporator coil, and routes that water through a sediment-carbon-UV filtration stack into a food-grade collection reservoir. A first build costs $150–$400 in parts and produces 1–5 litres per day at 50%+ relative humidity. The most reliable path on a first attempt is a tested DIY blueprint that covers circuit sizing, refrigerant quantities, and filter specifications — the Smart Water Box review explains what that blueprint includes.
Key Takeaways
- Minimum viable humidity: 50% relative humidity (RH); optimal range is 60–80% RH
- Core components: hermetic compressor, evaporator coil, condenser, food-grade collection tank, 3-stage filtration (sediment + activated carbon + UV)
- Build time: 12–20 hours for a methodical first-time builder
- Budget: $150–$400 for parts; add $50–$100 if you need to acquire basic tools
- Safety checkpoint: always flush 3–5 litres through the filtration stack and discard before drinking the output
Every dehumidifier already pulls water from air. The gap between a basement dehumidifier and a proper atmospheric water generator (AWG) is narrow but critical: filtration, sanitation, and a food-safe collection path. Get those three elements right and you have a genuine off-grid water source that functions as long as the air is humid enough.
This guide covers the full build — component selection, refrigeration circuit assembly, condensation chamber construction, filtration stack setup, and output testing. By the end you will know exactly what to source, what sequence to follow, and which water-safety checks the U.S. Environmental Protection Agency (EPA) and the WHO Guidelines for Drinking-water Quality recommend before putting that water in a glass.
How an Atmospheric Water Generator Works
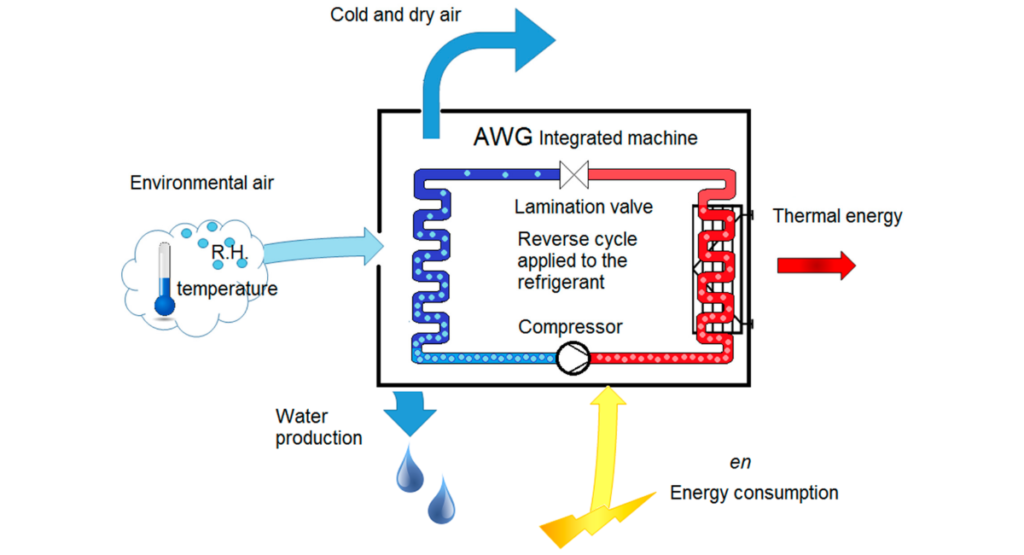
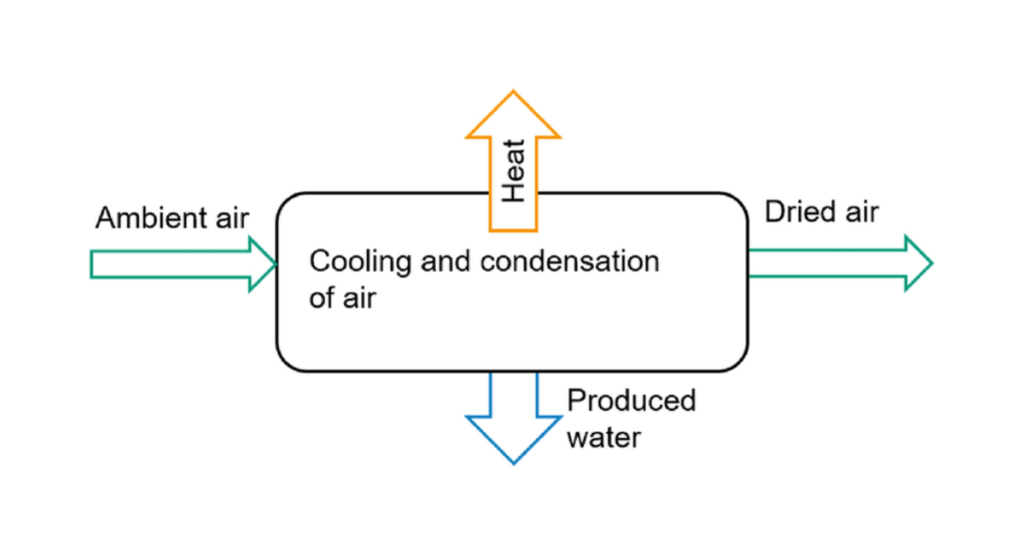
The physics is straightforward. Air holds a variable amount of water vapour depending on temperature and relative humidity. When you cool a surface below the air’s dew point, that vapour condenses into liquid — the same effect that beads droplets on the outside of a cold café glass on a humid afternoon in July.
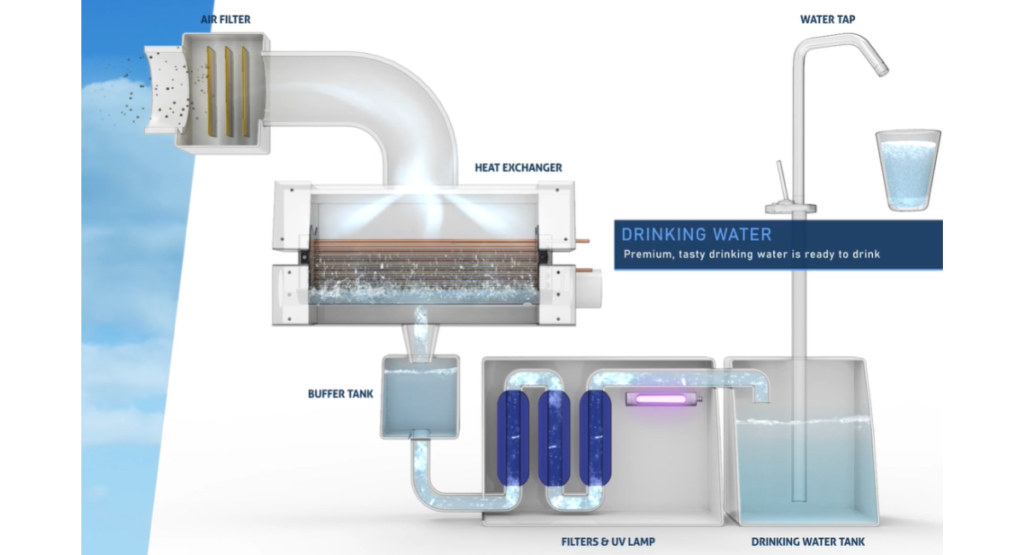
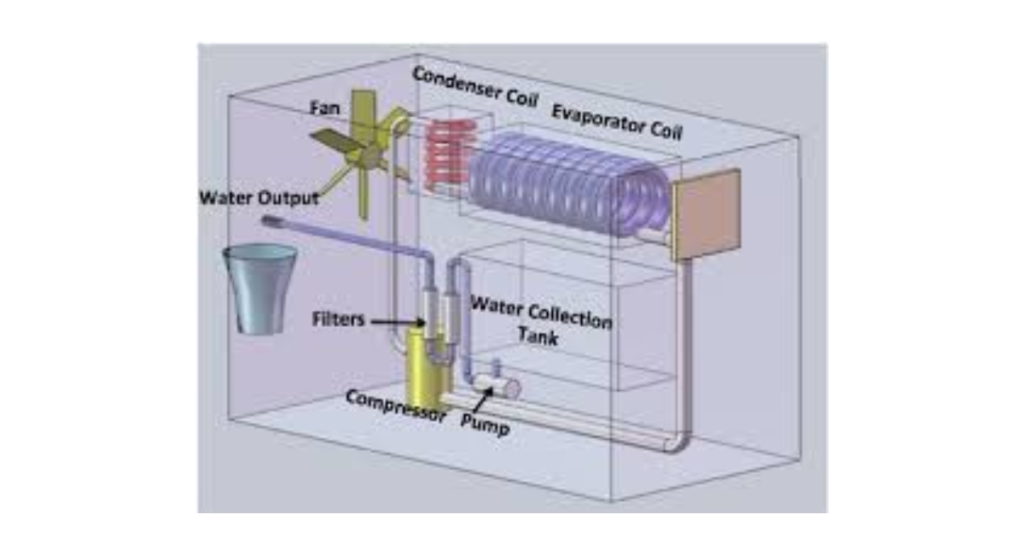
A DIY AWG structures this process across three stages. First, the refrigeration circuit: a hermetic compressor cycles refrigerant through an evaporator coil, chilling its surface to 45–55°F (7–13°C). Warm, humid air pushed across the coil deposits condensate. Second, collection: condensate drips by gravity from the coil into a food-grade reservoir. Third, filtration: water passes through a sediment pre-filter, an activated-carbon block, and a UV steriliser before reaching any dispenser.
For a deeper look at the underlying mechanism, the full explainer on how atmospheric water generators work covers each sub-system in greater detail.
Environmental Prerequisites: Will Your Climate Support a DIY AWG?
Relative Humidity
The National Oceanic and Atmospheric Administration (NOAA) defines relative humidity as the ratio of actual water vapour pressure to saturation pressure at a given temperature. Below 40% RH, most DIY AWG designs produce negligible output. Between 50–60% RH a well-calibrated unit delivers 1–3 litres per day. At 65–80% RH — typical of coastal or tropical climates — output climbs to 4–8 litres per day from a compact residential-scale compressor.
Check your average monthly RH values via the NOAA Climate Data Online portal before ordering parts. In arid zones where summer RH falls below 35%, a cistern system or rainwater harvesting setup is more cost-effective vis-à-vis an AWG build.
Temperature and Dew Point
The dew point is the temperature at which air reaches saturation and condensation begins. At 70°F (21°C) ambient and 60% RH, the dew point sits at roughly 55°F (13°C) — comfortably above the evaporator coil surface temperature and ideal for steady condensation. At 50°F (10°C) ambient and 55% RH, the dew point drops to around 33°F (1°C), which is at or below the coil surface and reduces useful output to near zero.
A practical threshold: ambient temperature above 65°F (18°C) and RH above 50% gives a workable dew-point margin for most compressor-based builds.
Components and Estimated Costs
The table below covers a standard single-compressor build. Prices reflect mid-2026 U.S. market rates; salvaged HVAC components can reduce the refrigeration portion by 40–60%.
| Component | Estimated Cost | Notes |
|---|---|---|
| Hermetic compressor (1/8–1/4 HP) | $40–$80 | Salvaged from window AC or mini-fridge; new units from HVAC wholesalers |
| Evaporator coil (copper, 3/8″ OD) | $20–$40 | Pre-bent coil or field-formed from copper roll stock |
| Condenser coil or brazed-plate HX | $15–$30 | Rejects heat to ambient; outdoor placement improves efficiency |
| Capillary tube or TXV | $5–$15 | Capillary tube is simpler for first builds; TXV improves regulation |
| Refrigerant R-134a (12 oz) | $15–$25 | EPA Section 608 certification required for purchase and handling in the U.S. |
| Food-grade HDPE collection tank (2–5 gal) | $15–$25 | NSF-61 certified preferred; stainless steel is an acceptable alternative |
| 5-micron sediment pre-filter | $10–$15 | Protects carbon and UV stages from particulate fouling |
| Activated-carbon block filter | $15–$20 | Removes chlorine by-products, VOCs, and taste/odour compounds |
| UV steriliser (4W–6W, 12V) | $25–$55 | Inactivates bacteria, viruses, Cryptosporidium, and Giardia per CDC guidance |
| 120mm cooling fan (12V DC) | $8–$15 | Moves air across the evaporator coil; quiet 2-pin models preferred |
| Enclosure / housing | $20–$40 | Plastic storage tote for prototyping; sheet metal for permanent installs |
| Wiring, fuses, switches | $15–$25 | 12V DC bus simplifies solar panel integration |
| Total | $203–$385 | Excludes labour and tools |
Step-by-Step Build Guide
Step 1: Assemble the Refrigeration Circuit
Begin with the compressor. If salvaged from an AC unit, inspect the start capacitor and test continuity on the run windings. Lay out the refrigerant circuit in this order: compressor discharge port → condenser coil (heat rejection side) → capillary tube or TXV → evaporator coil (cold side) → compressor suction port. All copper-to-copper joints must be silver-brazed — not soft-soldered — to handle operating pressures up to 200 psi without micro-leaks.
Pressure-test the sealed circuit with dry nitrogen at 150 psi. Hold for 30 minutes and watch the gauge. Any pressure drop means a leak; apply a soap-bubble solution to each joint to locate it. Repair before proceeding.
Charge with R-134a according to compressor specifications — typically 50–80 grams for a 1/8 HP unit. The EPA’s Section 608 refrigerant handling regulations require certification for purchase and handling of regulated refrigerants. If you are not certified, a local HVAC technician can charge the circuit for $30–$60.
Step 2: Build the Condensation Chamber
The evaporator coil sits inside an enclosed chamber with a warm-air inlet and a cool-air outlet. A plastic enclosure lined with 1-inch closed-cell polyethylene foam minimises heat ingress and improves efficiency. Mount the 12V cooling fan at the inlet so it pushes room air across the full coil surface.
Slope the coil mounting bracket 2–3 degrees toward a 3/4-inch HDPE drain port at the chamber floor. Condensate flows by gravity into the collection reservoir below. Seal any gaps around the drain tube to prevent recirculating cold air, which would waste compressor energy.
Step 3: Install the Collection Reservoir
Use an NSF-61-certified food-grade HDPE or stainless-steel tank. Before first use, sanitise with a solution of 1 tablespoon of unscented bleach per gallon of water. Fill the tank, let it sit for 30 minutes, then drain and rinse thoroughly. The tank lid should be sealed except for the condensate inlet fitting and the outlet port to the filtration stack.
Step 4: Set Up the Three-Stage Filtration Stack
Connect three inline filter housings in series: (1) 5-micron sediment cartridge removes suspended solids and particulates; (2) activated-carbon block removes volatile organic compounds, chlorine by-products, and odour; (3) UV steriliser inactivates microbial contaminants. The CDC Household Water Treatment guidelines confirm that UV radiation at an adequate dose (40 mJ/cm²) inactivates Cryptosporidium, Giardia, bacteria, and most viruses without introducing chemical residues.
Before collecting water for drinking, run 3–5 litres through the system and discard. This flushes carbon fines and factory residues from new cartridges — naïve as it seems to skip, this step prevents the most common first-week taste complaints.
Step 5: Wire the Electronics

A 12V DC bus simplifies solar or battery integration. Use 18 AWG wire for the fan and UV lamp circuits; 14 AWG for the compressor line. Install a 15A automotive blade fuse on the compressor circuit and a 5A fuse on the fan/UV branch. A 12V rocker switch on the main positive line provides clean on/off control.
For off-grid operation, a 100W solar panel paired with a 20Ah LiFePO4 battery delivers approximately 10–14 hours of runtime on a typical sunny day. The U.S. Department of Energy solar sizing guide provides a watt-hour calculator if you want to size your array precisely.
Step 6: Test, Measure, and Calibrate
Run the unit for 30 minutes. Check for refrigerant oil staining near brazed joints, verify condensate is flowing into the tank, and measure the evaporator coil surface temperature with a contact thermometer. Target surface temperature at steady state is 45–52°F (7–11°C). A reading above 55°F (13°C) suggests insufficient refrigerant charge or restricted airflow. A reading below 40°F (4°C) can cause frost to block the coil surface and reduce output — adjust the capillary tube length or add a short defrost interval.
Weigh the collection tank at the start and end of a 24-hour test run to calculate daily output in litres (1 kg ≈ 1 litre). Compare the figure against the expected output for your ambient temperature and RH conditions.
Real-World Output: What to Expect
Independent builders consistently report the following output ranges from a 1/8–1/4 HP compressor-based DIY AWG:
| Ambient Conditions | Expected Daily Output |
|---|---|
| 65°F (18°C) / 55% RH | 1.0–2.0 litres/day |
| 72°F (22°C) / 60% RH | 2.0–3.5 litres/day |
| 80°F (27°C) / 70% RH | 4.0–6.0 litres/day |
| 88°F (31°C) / 80% RH | 6.0–9.0 litres/day |
These numbers align with findings from a 2022 peer-reviewed study published in Heliyon comparing small-scale AWG prototypes across five climate zones. The other researchers found that every 10% increase in RH above 50% roughly doubled output for compressor-based systems drawing under 250W — a non-linear relationship that makes humid climates disproportionately productive for AWG technology.
Safety and Ongoing Water-Quality Maintenance
Condensed atmospheric water is not inherently pure. Airborne particulates, volatile organic compounds, and microorganisms all concentrate on evaporator coil surfaces over time, particularly in urban or industrial environments. The EPA’s National Primary Drinking Water Regulations set maximum contaminant levels (MCLs) for over 90 chemical and microbial parameters — your filtration stack should address the most common: coliform bacteria, turbidity, VOCs, and heavy metals if local air quality warrants it.
Recommended maintenance schedule:
- Replace sediment and carbon filter cartridges every 3–6 months (or per manufacturer specification, whichever comes first)
- Replace the UV lamp annually — UV output from quartz-envelope lamps degrades roughly 40% over 9,000 hours of use even if the lamp still illuminates
- Sanitise the collection reservoir monthly with a dilute bleach solution
- If in doubt, submit a water sample to a state-certified EPA testing laboratory — a basic coliform, turbidity, and pH panel typically costs $30–$80
When a Pre-Designed Blueprint Makes More Sense
A from-scratch build is genuinely rewarding and teaches you HVAC fundamentals that serve you well beyond this one project. It also requires silver-brazing refrigerant lines, pressure-testing sealed circuits, and sourcing a dozen compatible components — skills with a real learning curve. Common first-build mistakes include oversizing the capillary tube (reducing efficiency), under-charging refrigerant (cutting output by 40–50%), and sizing the UV chamber incorrectly (reducing pathogen inactivation dose below the CDC-recommended 40 mJ/cm²).
A validated DIY blueprint short-circuits the trial-and-error phase by providing exact component specifications, a tested refrigerant charge weight, and a filter stack configuration already validated for drinking-water output. The Smart Water Box blueprint is the option I have examined most closely — the review covers what is included, what it costs, and what real builders report about their results.
Ready to Build Your Own AWG?
The Smart Water Box blueprint covers every step in this guide — with exact component specs, a tested refrigerant charge table, and a filtration stack validated for safe drinking-water output. Skip the trial-and-error phase that costs most first-time builders $80–$150 in re-work.
Where to Go Next
- How Atmospheric Water Generators Work — deeper dive into the physics and sub-system design
- Best Off-Grid Water Systems Compared — see how an AWG stacks up against rainwater, well, and cistern alternatives
- DIY Off-Grid Water System: Beginner’s Guide — start here if you are new to off-grid water planning
Frequently Asked Questions
- Can I build a DIY atmospheric water generator without HVAC experience?
Yes, but refrigerant handling requires care. The EPA’s Section 608 rules permit uncertified individuals to work on self-contained pre-charged systems (such as salvaged mini-fridge units). If you are charging a fresh circuit with R-134a, hiring a certified HVAC technician for that single step is the simplest route. All other steps — coil mounting, filtration plumbing, and 12V wiring — are accessible to any methodical first-time builder.
- How much electricity does a DIY AWG use per litre of water produced?
A 1/8 HP (93W) compressor running 24 hours draws roughly 2.2 kWh per day. At a yield of 2–4 litres per day in moderate humidity, that equals 0.55–1.1 kWh per litre — comparable to commercial AWG units in the same size class. At 72°F (22°C) and 70% RH, some optimised builds achieve 0.3–0.4 kWh per litre.
- Is water from a DIY AWG safe to drink without extra treatment?
Not from the condensation stage alone. Evaporator coil and collection surfaces can harbour bacteria, and airborne contaminants concentrate in the condensate. A three-stage filter stack — sediment, activated carbon, and UV at 40 mJ/cm² — brings the water to a quality profile that meets WHO and EPA primary drinking water standards for most parameters. Some builders add a reverse osmosis membrane for extra protection in high-pollution environments.
- What is the cheapest working DIY atmospheric water generator design?
A salvaged mini-fridge compressor with the evaporator coil rerouted into an enclosed condensation chamber, a single carbon block filter, and gravity feed to a food-grade container can be built for under $100 in parts. This design skips UV treatment and uses a sub-optimal coil geometry, so output is lower and water safety relies entirely on the carbon filter. It is adequate for emergency storage in a humid environment but not recommended as a daily drinking-water system without adding UV treatment.
- How long does a complete DIY AWG build take from start to finish?
Most first-time builders report 12–20 hours spread across 2–3 sessions: roughly 4–6 hours for refrigeration circuit assembly and pressure testing, 3–4 hours for chamber and tank construction, 2–3 hours for filtration plumbing and wiring, and 2–4 hours for testing and adjustment. Following a tested blueprint with pre-specified components typically cuts total build time by 30–40% by eliminating re-work and component sourcing delays.
Leave a Reply